Welcome to Yongyi Fasteners, Your Reliable Fastener Supply Partner!

-
ProductsWe supply flat washers, spring washers, drop-in anchors, anchor bolts, hex nuts, hex bolts, sleeve anchors, threaded rods and OEM fastener products to DIN, BS, ANSI and MS standards.

-
About usHEBEI YONGYI FASTENERS MANUFACTURING CO.,LTD is located in China's largest fasteners production base Yongnian fasteners centre.
-
NewsHebei Yongyi Fasteners shares company updates, product knowledge and fastener industry news for global buyers.
-
ServiceThe products sold throughout the domestic and exported to Southeast Asia and Europe and other countries and regions. Our products win good reputation with domestic and foreign customers.



YONGYI FASTENERS
Support stable quality from material selection, processing and inspection to final delivery.
FOCUS ON HOT SPOTS


Sleeve Anchor Strength Starts with Simple Steps
Published:
2026-05-08
Author:
YONGYI FASTENERS
A sleeve anchor secures fixtures to concrete, brick, or block by expanding inside the hole, providing strong, reliable hold when installed correctly.
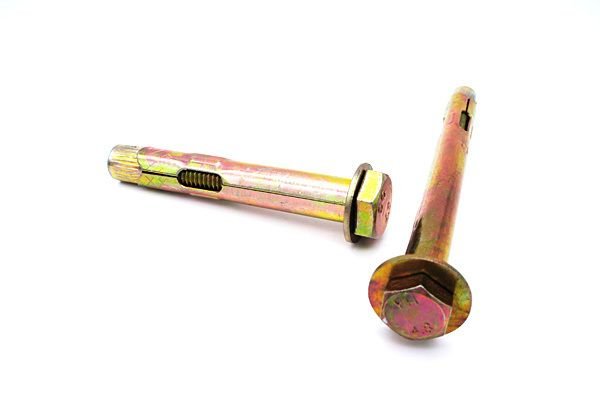
A sleeve anchor lets you attach things tightly to concrete, brick, or block. This anchor has a simple design with a head bolt, expansion tube, flat washer, expansion nut, and hex nut. These parts work together to spread force over a bigger area. This makes the connection strong and steady. Installing it the right way gives you the best strength and reliability. If you are new to DIY projects, using a sleeve anchor is easy and works well.
Key Takeaways
A sleeve anchor holds fixtures tightly on concrete, brick, or block.
Installing it the right way makes it strong and reliable.
Pick the correct size sleeve anchor for your fixture’s thickness and weight.
Drill a clean hole so the sleeve anchor can grip well.
Tighten the hex nut slowly so you do not break the anchor or base.
Check anchors often for movement, damage, or rust.
Do not use weak anchors or place fixtures wrong to keep things safe.
Always follow the manufacturer’s instructions for installing and caring for anchors.
What is a sleeve anchor
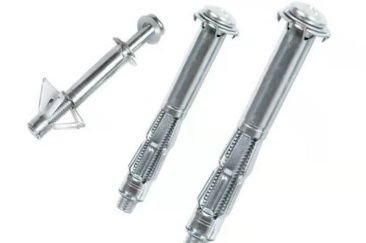
A sleeve anchor helps you attach things to concrete, brick, or block. You use it when you need a strong hold in materials that are not solid. The anchor spreads force along its length. This makes it reliable for many uses. YONGYI FASTENERS makes sleeve anchors that work in dense and hollow materials.
Sleeve anchor components
A sleeve anchor has several parts. Each part helps make the anchor strong. The table below lists the main parts and what they do:
There is a tapered cone at the end of the bolt. The cone pulls into the sleeve and makes it expand. The expansion tube grips the hole walls. This gives you a strong bond.
Sleeve anchor vs. other anchors
There are many types of anchors. Sleeve anchors expand along their whole length. This lets you use them in concrete, block, brick, and stone. Wedge anchors only expand at the bottom and need solid concrete. Screw anchors work in similar materials and can be removed.
Sleeve anchors are good for many projects. You can use them for handrails, electrical fixtures, signs, and masonry. The table below compares sleeve anchors with other anchors:
Sleeve anchors are flexible. You can put them in hollow or less dense materials. This makes them useful for many jobs. For more anchor standards, visit ASTM International - Anchor Standards.
Tip: Always pick the right anchor for your project material.
How sleeve anchors work
Mechanical expansion anchors explained
Mechanical expansion anchors help you hold things in concrete, brick, or block. They use a simple idea to make a strong grip. When you tighten the nut, the anchor gets bigger inside the hole. This makes the anchor press against the walls. The tight grip keeps things from moving or shaking loose.
Each part of the anchor works together to make it strong. The bolt body has a cone at the end. When you turn the nut, the cone moves into the sleeve. The sleeve pushes out and presses on the hole sides. This makes a strong bond. The bond keeps your fixture safe, even if it is heavy.
Here is a table that shows how each part helps make the anchor strong:
You get the best results when the anchor fits the hole and material. This lets the sleeve grip the walls tightly.
Expansion process
Drilling the hole
First, mark where you want to put the anchor. Use a hammer drill with a carbide-tipped bit. Make sure the hole is the right size and depth for your anchor. A good hole helps the sleeve grip better.
Inserting the anchor
Clean out all dust and dirt from the hole. Put the anchor in until the washer and nut are flat with the surface. The anchor should fit tightly. If the hole is too big or small, the anchor will not work right.
Expanding the sleeve
Start tightening the hex nut. As you turn the nut, the bolt pulls the cone into the sleeve. The sleeve spreads out and presses on the hole sides. This locks the anchor in place. You will feel the sleeve grip the material.
Securing the fixture
Put your fixture over the anchor. Tighten the nut until the fixture does not move. The bond keeps everything steady. You can use this for shelves, handrails, or heavy equipment.
Tip: Always use the right amount of force when tightening. If you tighten too much, you can break the anchor or the base material.
Mechanical expansion anchors help you feel sure about your installation. The expansion process makes a strong bond that lasts. You can use sleeve anchors for many jobs where safety and strength are important.
Sleeve anchor strength: simple steps
You can make mechanical expansion anchors very strong by following easy steps. Every step is important for how well your sleeve anchor works. If you skip or rush a step, the anchor may not hold as much weight.
Importance of correct installation
Installing anchors the right way helps them work as they should. You need to pick the right anchor for your project and the material you use. To follow these steps for the best results:
Choosing the right size
Pick a sleeve anchor that fits the thickness and weight of your fixture. Check the diameter and length to match the material. If the anchor is too small, it will not hold enough weight. If it is too big, it can hurt the base material. Always look at safety rules, like OSHA guidelines, to help you choose the right size.
Preparing the hole
Drill a hole that is the same size as your sleeve anchor. Use a hammer drill for concrete, brick, or block. Clean out all the dust and dirt from the hole. A clean hole helps the anchor grip the material better. If you leave dust inside, the anchor might slip or not work.
Tightening the nut
Put your fixture over the anchor. Tighten the hex nut slowly and evenly. You should feel it get harder to turn as the expansion tube presses on the hole walls. Do not tighten too much. If you do, you can crack the base or bend the anchor. Use a torque wrench if you can to control how tight it gets.
Tip: Always read the manufacturer's instructions for how tight to make it and how to install it.
Common mistakes
Mistakes when you install anchors can make them weak and cause them to fail early. You can stop these problems by watching out for these things:
No (or weak) anchors: If you use weak anchors, the fixture can break when pushed or pulled.
Using the joint to fix misalignment: Trying to fix misalignment with the anchor puts stress on the joint and can make it fail.
Not using control rods: Control rods stop the anchor from stretching too much and keep things safe. If you skip them, the anchor may not work right.
Painting the rubber: Paint can hurt the rubber and stop it from moving. This can cause cracks and make it work worse.
Always check your sleeve anchors after you put them in. Look for things like misalignment, cracks, or loose parts. If you see a problem, fix it right away to keep the anchor strong and safe.
Note: Picking the right anchor and following the right steps will help you avoid mistakes and make sure your anchors work well.
Install sleeve anchors: step-by-step
Tools and materials
You need the right tools to install sleeve anchors. Using the correct equipment helps you get a tight fit and stops mistakes. The table below shows what tools work best for different materials:
For sleeve anchors, use a hammer drill and a carbide-tipped bit. The bit should match the anchor size. Clean the hole with a hand pump or compressed air. Use a torque wrench to tighten the nut. You also need your fixture and the sleeve anchor. These tools help you install strong fasteners with accuracy.
Installation guide
Mark and drill
Mark the spot for the anchor with a pencil or marker. Drill a hole with the right size and depth. Make sure the hole fits the anchor. Use a hammer drill for concrete, brick, or block. Drill straight so the anchor lines up right.
Clean the hole
Take out dust and dirt from the hole. Use a hand pump or compressed air. Clean the hole at least three times. A clean hole lets the sleeve expand and grip the material. If you skip cleaning, the anchor might slip or not hold.
Insert and tighten
Put the sleeve anchor in the hole. The washer and nut should be flat with the surface. Place your fixture over the anchor. Tighten the hex nut slowly. Use a torque wrench if you have one. Stop when you reach the torque the manufacturer says. The sleeve expands and locks the anchor. Now you have a strong connection.
Tip: Always check the anchor’s position before tightening. Good placement stops stress and gives the most strength.
Safety tips
Safety is important when you install anchors. You protect yourself and your project by following these rules. The table below lists safety steps:
Wear safety goggles and gloves. Keep your workspace neat. Check the material for cracks or weak spots. Follow torque rules to avoid breaking the material. Keep anchors spaced apart to stop structural problems.
Note: Careful planning and using the right steps help you get a strong and safe installation every time.
Uses and limitations
Where to use sleeve anchors
Mechanical expansion anchors can be used in many materials. They are best for tough surfaces that need a strong hold. Here are some places where you can use them:
Concrete
Concrete is a good base for mechanical expansion anchors. You can attach heavy things like railings or machines. The anchor expands inside the hole and grips the concrete. This gives you a strong and steady connection. Always check how thick the concrete is before you start.
Brick
Brick walls need special care when using anchors. Mechanical expansion anchors work well in solid brick. You can use them for shelves, signs, or outdoor items. Always drill into the solid brick, not the mortar. This helps the anchor grip better and keeps it from slipping.
Block
Block walls can be hollow or solid. They accept mechanical expansion anchors for light or medium loads. In hollow blocks, the anchor expands against the inside wall. Do not put anchors too close to the edge of the block. This stops cracks and keeps your installation safe.
Tip: Always pick the right anchor size for your material and fixture weight.
Limitations
Mechanical expansion anchors have many good points, but they also have limits. These anchors depend on how strong the base material is. If you use them in weak or crumbly surfaces, they may not hold well. Do not use them in soft stone or materials that cannot handle expansion.
You must think about spacing. If anchors are too close together, the material can get weak. Always follow spacing rules to keep things strong. Tightening too much can break the anchor or the base. Use a torque wrench to control how tight you make it.
Mechanical expansion anchors work best in dry and stable places. If you use them where there is vibration or moisture, check them often. Regular checks help you find movement or loosening early.
Note: Knowing where and how to use sleeve anchors helps your installation work well and keeps your project safe.
Troubleshooting sleeve anchors
Signs of improper installation
You can find problems with sleeve anchors by watching for warning signs. If a fixture moves, the anchor may not have expanded enough. Cracks near the anchor can mean you tightened the nut too much. Sometimes, the anchor turns in the hole instead of staying still. This usually happens if the hole is too big or dirty. Rust or corrosion on metal parts can show there is moisture. Always look for these signs after you install the anchor.
Common warning signs:
Fixture moves or shakes
Anchor turns when you tighten it
Cracks show up near the anchor
Rust or stains on metal parts
Anchor does not sit flat
Tip: Finding problems early helps you fix them before they get worse.
Fixing common issues
Most anchor problems can be fixed with easy steps. If the anchor turns, take it out and use a new one with the right hole size. Clean the hole well before you put the anchor back in. For loose fixtures, check if the nut is tight enough. If not, tighten it to the right torque. If you see cracks, stop and check the base material. You might need to move the anchor to a stronger spot. For rust, clean the area and change the anchor if needed.
Quick solutions table:
Note: Always use the right tools and follow the manufacturer's instructions for best results.
Maintenance tips
Regular checks help keep your anchors strong and safe. Look at each anchor every few months, especially where there is vibration or moisture. Tighten any nuts that are loose. Clean dust or dirt from around the anchor. If you see rust, fix it right away. Change any anchor that looks damaged or worn. Keep a list of your checks to see if anything changes over time.
Maintenance checklist:
Check anchors for movement or damage
Tighten nuts if needed
Clean around anchors
Watch for rust or stains
Change damaged anchors
Callout: Good maintenance helps your installation last longer and keeps everything safe.
You now know that sleeve anchors give you a secure way to attach fixtures to concrete, brick, or block. These high-strength fasteners deliver reliable pullout strength when you install them correctly. Always follow each step for the best results. Check the size, clean the hole, and tighten the nut with care. For your project, review the manufacturer’s guidelines to match the anchor to your needs. Simple steps lead to strong, lasting connections.
FAQ
How do you choose the right size sleeve anchor?
Check the thickness of your fixture and the base material. Select an anchor with enough length to pass through both. Always match the anchor diameter to the hole size for a secure fit.
Can you reuse a sleeve anchor after removal?
No, you should not reuse sleeve anchors. Removing them can damage the expansion sleeve. Always use a new anchor for each installation to ensure safety and strength.
What tools do you need for installing sleeve anchors?
You need a hammer drill, a carbide-tipped drill bit, a torque wrench, and a hand pump or compressed air for cleaning. Safety goggles and gloves protect you during installation.
Why does my sleeve anchor spin in the hole?
A spinning anchor means the hole is too large or has dust inside. Clean the hole well and use the correct drill bit size. Replace the anchor if it does not grip.
How close can you place sleeve anchors to an edge?
Keep anchors at least five anchor diameters away from any edge. This prevents cracking and keeps the base material strong. Measure carefully before drilling.
Are sleeve anchors suitable for outdoor use?
Yes, you can use sleeve anchors outdoors. Choose anchors with corrosion-resistant coatings for the best performance in wet or humid conditions.
What should you do if the anchor will not tighten?
Stop and check for dust or debris in the hole. Clean it out and try again. If the anchor still will not tighten, use a new anchor with the correct size.
Can you install sleeve anchors in hollow block?
Yes, you can install sleeve anchors in hollow block. Make sure the anchor expands against the inner wall. Use light to medium loads for best results.
Get Quote
Welcome To Know Our Products
Get Product and Service Information
Follow us
We provide OEM service and focus on stable quality, competitive pricing and responsive export support.


Contact Info
Add:Dongmingyang Industrial Park, Mingguan Town, Yongnian District, Handan City, Hebei Province China
Export salesman:
WhatsApp:+86 18830064300
E-mail: sales@hgtfix.com
Export salesman:
WhatsApp
+86 18830064300
E-mail:
Copyright © 2022 HEBEI YONGYI FASTENERS MANUFACTURING CO.,LTD Power by 300.cn | SEO